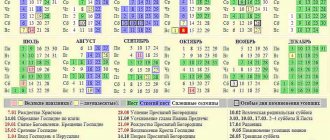
People who have only recently joined faith in God often have questions related to the design of their home iconostasis. In accordance with the centuries-old Orthodox tradition, in every house, be it a peasant hut or a boyar's mansion, icons were located in the corner, which was called red, and the presence of icons seemed to fill the house with a feeling of goodness and spiritual purity. Now this tradition is gradually being restored, which is of great importance, but new converts have many questions. Let's try to answer the most common questions about home iconostasis.
In what corner are icons placed in the room?
According to Orthodox tradition, this should be the south-eastern corner of the room, but if the room is too small, then you can place the icons in a free corner or against the wall. The main thing is that there are no secular objects next to them (paintings, posters, posters, calendars, etc.).
So, we found out where the icons should be in the house. Just stand, because according to tradition they are placed in an icon case or on a special shelf covered with an embroidered towel or lace napkins. The shelf is often decorated with artificial or fresh flowers, a bouquet of herbs is placed on Trinity, blessed eggs are placed on Easter, a vessel with holy water is placed, etc.
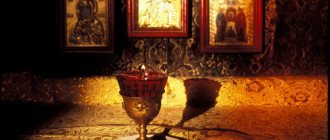
During prayer, candles are lit in front of the icons, so you should take care of fire safety
It is best to hang or place a lamp and light it during prayer, as well as on Sundays and church holidays.
It is probably unnecessary to remind you that the home iconostasis must be kept impeccably clean, and the dust from the icons is not wiped off with a cloth, but brushed off with a feather.
Home iconostasis
The iconostasis of the house is a red corner, that is, a special place for icons near the eastern wall in the homes of Orthodox Christians. The tradition of setting up and venerating the holy corner has a long history. In the Old Slavonic language, the word “red” meant a high degree of beauty, the most beautiful. This epithet in relation to the corner with icons emphasized its sacredness and significance. This was the most honorable place in the house. Today, in Orthodox Slavic countries, the pious traditions of the holy corner and family prayer at the home iconostasis are being revived.
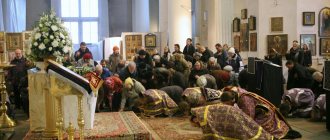
The home of an Orthodox Christian can be compared to a small, home Church, where the red corner is like an altar. Often in this place there is a table with sacred books - a symbol of the church throne. The liturgical conciliar prayer in the church should continue with personal prayer in the small Church. In front of the home iconostasis, believers offer daily prayers to God, read canons, akathists, the Psalter, and proceed to Communion.
What icons traditionally make up the iconostasis?
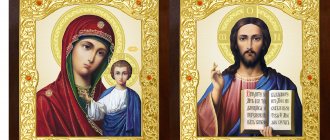
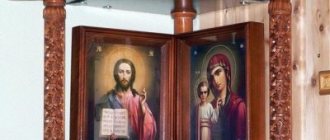
The home iconostasis must have icons of the Savior, the Holy Trinity and the Mother of God. It also matters in what order the icons are arranged in the iconostasis: the above icons should be on the top shelf, and the rest, which you can choose at your discretion, are located below.
It is desirable that the home iconostasis contain icons of saints whose names are borne by family members, and you need to know the history of these saints. Often they choose icons of saints that help maintain peace and harmony in the family and overcome life’s hardships (Nicholas the Wonderworker, Matrona of Moscow, Panteleimon the Healer, etc.). There should be no foreign objects in the home iconostasis, including photographs of relatives.
Basic rules for placing icons
According to church traditions, believers should pray facing the east. Therefore, it is recommended to place icons on the eastern side of the apartment. If you have such an opportunity, place the iconostasis in the east.
However, in many cases in the east, modern buildings have doors or windows and, accordingly, then it will not be possible to place the image there. But how to properly hang icons in an apartment in this case? Choose any other wall, because it is impossible to change the location of the building in modern conditions.
It is important not only the location of the wall relative to the cardinal points, but also its freedom and accessibility. Standing in front of the icons should be convenient for all family members, especially if the family practices joint prayer.
Location of icons on the iconostasis
Knowing what icons you need to have at home, you should also arrange them correctly. The placement of icons on the home iconostasis is strictly regulated: the icons of the Savior, the Mother of God and the Holy Trinity must be located above all other icons.
If all the icons are on the same surface (for example, on a bedside table), then the icon of the Savior is placed in the center, the Mother of God and the Holy Trinity are placed on the sides of it, and all the others are placed slightly away from these main icons.
What is an iconostasis
The word “iconostasis” translated from Greek means “place for an image.” This is the name given to the partition with icons in the Orthodox Church, which separates the altar (the main part of the temple) from the rest of the room. The altar is a symbol of the place of Divine existence and grace, which is opposed to our world. Therefore, the most holy area of the temple is located on a hill and is separated by an iconostasis.
The prototype of the iconostasis is the templon - a Byzantine stone altar barrier on which icons were placed. Over the centuries, the number of tiers on the barrier increased. The main row of icons with the central image of the Lord was called “deesis”, which translates as “prayer”. The entire iconostasis began to be called Deesis, and in the 17th century the term “iconostasis,” which is close to the modern one, appeared. The altar barrier was increasingly made of wood. It turned into a huge icon frame with numerous decorative elements: columns, cornices, rosettes, and meander ornaments.
Holy images on the iconostasis are placed in strict order. For example, in the center of the lower tier on the Royal Doors four evangelists and the Annunciation of the Virgin Mary are depicted. To the right of the Royal Doors is an icon of the Lord, to the left is the Mother of God. On the sides there may be images of local saints. Above is a row with icons of the main Christian holidays. The third is the Deesis series with the Savior, the Mother of God, the Prophet John the Baptist, the apostles and angels. The Old Testament prophets and forefathers are depicted on the fourth and fifth rows, respectively.
Thus, the iconostasis shows us a rich collection of sacred images. It presents the fullness of Christian holiness and key sacred events. The iconostasis can be called a cathedral and multifaceted icon of the entire Holy Church.
Correct placement of icons in the house
The location of icons in the house may be different. You can arrange the main iconostasis in one room, and place some icons (for example, patron saints) in each room and even in the kitchen.
If it is not possible to arrange an iconostasis in the red corner, then you can select a separate table or bedside table, but there should not be any extraneous objects on them, that is, not related to prayers.
You can hang icons everywhere in the house. The only places where icons cannot be placed are the toilet and bathroom.
Is it possible to put an icon on an icon?
No, you need to place them separately.
Icons in the kitchen
These can be images of the Savior, the Mother of God or the Holy Trinity, to which prayer is offered before the meal, or other icons of your choice. It is better to place icons in the kitchen away from the stove so that they do not get dirty. You can hang them in the corner opposite the stove or put them in a kitchen cabinet behind glass.
Where should I place the icons?
Photo: Elitsy.ru
When arranging a home iconostasis, it is important to remember that the degree of piety in Orthodoxy is never determined by the number of icons. It is considered sacrilege to collect them as interior decoration or to collect them, even from an art historical point of view. You should always remember the main purpose of the holy image - prayer.
When deciding where to arrange a red corner, preference has long been given to a place that immediately catches the eye. Not only icons, but also other items related to Orthodox holidays were necessarily placed here. For example, on Forgiveness Sunday it could be a willow branch.
In the apartment, icons were supposed to be hung on the wall facing east. True, if this condition cannot be fulfilled, this is not considered too great a violation.
It is much more important to provide any person with free access to the iconostasis. The believer should not feel cramped conditions or physical discomfort that will distract him from prayer.
It is important to meet some conditions:
- there should be no household appliances or designer items near the holy images;
- there should be no books that contradict Christian teaching;
- You should not hang other images of saints nearby, for example, their photographic portraits.
The home iconostasis is decorated only with hand-embroidered towels. Only lamps, candles and blessed oils may be kept nearby on a permanent basis.
Common Mistakes
When arranging the iconostasis, people who have superficial knowledge of church paraphernalia often make mistakes. The most common ones include:
- placing secular objects next to sacred images - figurines, cosmetics, household appliances and various decorative items;
- a combination of divine paintings with non-icon paintings, calendars and posters;
- an excessive number of images, because of which the place for prayer seems crowded, and the atmosphere of calm and solitude is lost;
- violation of hierarchy when arranging paintings on shelves.
Required materials and tools
To make a corner shelf, wood of various decorative species is used - for example, oak or cherry. A less expensive material would be pine board. In addition to wood, you can also use plywood or chipboard. The thickness of the board can vary from 1.5cm to 2.5cm. You will also need boards of small width in order to carve the supports.
To work you will need the following tools:
- tape measure or ruler;
- hacksaw;
- sandpaper for wood;
- electric jigsaw;
- electric drill;
- self-tapping screws;
- wood glue;
- wood varnish.
Required Tools
To attach the finished shelf to the wall, you will also need masonry drills, metal corners or hinges, and self-tapping screws with dowels.
Features of the location of the Old Believers
Even in popular manifestations, the Old Belief assigned the main role to Christ, therefore, at the head of the iconostasis, arranged according to the old rites, an icon of the Son of God or a cross with a crucifix is always placed. Old Believers choose a place for other icons arbitrarily, especially when it is not possible to place all the main images of saints. At the same time, most Old Believers adhere to the rules for arranging divine paintings according to their status.
Is it possible to hang an icon above the door?
Yes, you can, there are no prohibitions here. But you need to understand that an icon is not a talisman that can protect a house from ill-wishers. It is necessary at the entrance to the house only so that the person who enters and sees it can remember the name of God, pray, thank the higher powers, and ask for their intercession in any endeavors. As for what kind of icon can be hung above the front door, these are: “Savior on Ubrus”, “Seven Shot” (helps to reject bad thoughts), “Impenetrable Door” (helps to quickly overcome troubles and troubles), “Guardian Angel” ( removes unclean forces from household members and the house) and others. In principle, there are no restrictions.
History of the red corner
Every person has heard the phrase “red corner” or “God’s place”. However, not everyone knows why this place received such a name and how correctly it was located. You can often hear the answer that this is the right corner from the door. But it is not always the case.
Ethnographers claim that in past times, “God’s place” was located diagonally from the stove.
And this was done for a reason. The word red was associated with spring, summer and warmth, so they tried to place icons more on the south or east side.
The north and west for the ancient Slavs were comparable to death, evil spirits and severe winter. A little later, these stereotypes diverged, and people began to simply create cozy corners with numerous icons.
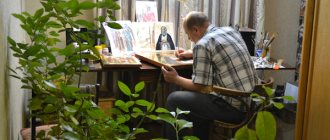
Manufacturing stages
Carved corner shelf for handmade icons with a drawing Before starting work, you should make a drawing of the project. The size and number of shelves depend on the type of icons that will be placed on the finished home iconostasis. To make a simple two-tier shelf, you will need two 1.5 cm thick pine boards, as well as four supports.
We cut out three parts using a jigsaw according to the template - sidewall, side and bottom
The workpiece is milled using a stencil using special equipment
To turn decorative parts you will need a lathe or take them ready-made
We assemble the shelf - the bottoms are screwed to the turned elements using self-tapping screws
When connecting the sidewalls to the bottoms, the screws should hit the middle of the ends of the bottoms
The sides are screwed on using cylinders - self-tapping screws are inserted into the holes from the bottom, the cylinders are put on, the hardware is screwed into the side
The final stage is coating the finished product with drying oil and attaching it to brackets in the corner
After completion of the work, the finished shelf is treated with stain and varnish. Both colorless varnishes and those that give the board the color of different types of wood are suitable. When choosing a quick-drying varnish, the product is ready for use in a few hours.
Small shelves for icons of different colors - pine, walnut, mahogany
Decoration
Depending on the complexity of the elements for decorating a shelf for icons, you can make them yourself or purchase them ready-made.
The most common way to decorate a home icon case is wood carving. You can do it yourself using a jigsaw. If you do not have the necessary experience, carved elements can be bought at a hardware store or ordered in a workshop. The finished carved plates are attached to the shelf with wood glue.
Soft wood is selected for carving: birch, spruce, pine, aspen or juniper
Another way to decorate is to burn out the ornament using a special device - for this, you first apply a drawing of the pattern to the wood with a pencil. The shelf can also be painted - special wood paints are sold in construction departments. An alternative to strict monochromatic painting is to apply a pattern to the enamel with paint of a different color.
You can burn out the ornament and then open individual fragments of the image on the shelf with enamel
To further strengthen and decorate the shelf, its back walls are covered with a wooden panel. It can also be decorated with carvings, painted with varnish and enamel.
Shelf for icons with a beautiful back wall
To decorate the upper part of the shelf for icons, you can choose the outline of an Orthodox church
When using a plywood board, these methods will not work - but painting with acrylic paint with the addition of gilding will look impressive on such a panel.
A small figured shelf for icons with candlesticks and a lamp
Stand for holy images made of plywood
Shelf parameters and design may vary. It is important that the icons you need are placed there. This plywood shelf will be made with dimensions of 30x35x4 cm. What you will need for this:
- Pine board measuring 1.5-2.0 cm thick and 15 cm wide.
- Prepared glued board to form the bottom of the cabinet, 1.5 cm thick and 21 cm wide.
- Small pieces of fiberboard and birch plywood for sketching.
- Sandpaper.
- Self-tapping screws.
- A jigsaw is best if it is electric.
- Drill and drill bits.
- Milling table.
- Lathe.
- Pencil and meter ruler.
First, we draw and prepare future templates from fiberboard. This is done simply:
- We make a drawing on the fiberboard in natural volume and cut them out using a jigsaw.
- Next, we sand it with sandpaper to the parameters we need.
- We delimit the places for screws on the templates.
- We take the prepared blanks, transfer them to plywood and cut them out using a jigsaw and grind off the irregularities.
- The result should be: side, side and bottom.
- Now mark the holes with a pencil. There should be 2 of them on the bottom, 3 on the side, 4 on the side. We drill out the marked places and get holes for connecting the template to the workpiece.
The last step is to attach the template to the workpiece using self-tapping screws.
The sides and sides are cut down in the same way, and 6 holes are marked: 2 on the bottom, 2 for the side, 2 for the side.
Now using the machine we make 2 identical parts.